
Hello readers! How are you?
As you can see, I’ve changed Elegant Poupée’s appearance a little. It still needs some work though.
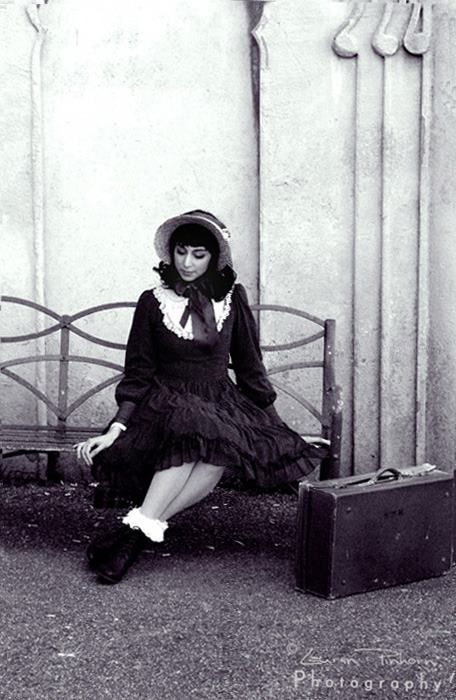
Today I’ve put together a tutorial for you. I’ll explain how I made the straw half-bonnet I wore for my recent photoshoot (it’s very simple!) as well as sharing some general bonnet tips.
~STRAW HALF-BONNET TUTORIAL~
This bonnet was constructed from an existing straw hat. There are just five simple steps to make it.

I started with an ordinary straw hat. This one is quite small, meant for children to decorate for Easter. It’s constructed in a continuous strip of woven straw, which makes it very easy to work with. This tutorial may not work as well for other types of straw hats!

1. The first thing to do is cut a slit into the brim and up to the crown. Then cut away the top part of the crown (half-bonnets have no back to them). Cut along the edge of the woven strip for a neat finish. It sort of looks like a half bonnet already, doesn’t it?

2. Now we have to determine how much of the brim to cut away. I did this by cutting away at the brim bit by bit and trying it on until I was happy with it. This is what I ended up with. You can refer to the photo at the beginning of the post to see what size we are aiming for.

3. Of course, we are now left with rough edges where we have cut into the straw. We’ll cover those up by stitching ribbon or bias binding around. As you can see, I incorporated the bonnet ties into the binding. At this point, the bonnet is basically finished! That was easy, wasn’t it?

4. We are missing one important thing though, and that is a little decoration to make our bonnet pretty. Since it’s a straw bonnet with a country loli feeling, flowers, fruit, cotton lace or gingham ribbon might be nice. I coloured in these white foam craft roses with marker pens to match my chosen colour scheme, and tea-stained the doilies I bought from Daiso in Singapore to make my bonnet adornments.

5. Since the shape of the bonnet has somewhat unsightly corners, it’s better to arrange the decoration to cover them. Although, the corners are much less noticeable when worn. Sew or glue your decorations on firmly. Well done, your straw half-bonnet is finished!

My tutorial was the cheat’s way to do it, but if you’d like to try something a bit more professional, how about taking a look at this lovely tutorial from Tyler of Lily of the Valley?
Bonnets take a bit of confidence to wear, so for now I’m starting small and simple. I would love to wear a more grand bonnet for a photoshoot or Lolita tea party! Maybe when I’ve gained more confidence I’ll wear one for going to buy milk or post a letter…. There are a few brands whose bonnets make me dream of that day!
Triple Fortune http://3-f.jp/
The milliners that make a classic lolita’s heart beat faster! I tried on a most beautiful pale blue bonnet in Atelier Pierrot two summer ago, I regret so much that I didn’t get it.
A brand run by Caro of Fyeah Lolita. Check the bonnet gallery for pictures of her wonderful creations!
Kaleido Waltz http://yaplog.jp/kaleidowaltz/
The website hasn’t been updated forever, so I suspect this brand is on hiatus. However we can still enjoy beautiful pictures of these lovely and intricate bonnets. Sumika-san, the designer, is so stylish! Perhaps you’ve seen her snap in KERA or Gothic and Lolita Bible?
Thank you very much for reading today’s entry. I hope you found it useful and perhaps even interesting! Which bonnet brands do you admire? Do you know what happened to Kaleido Waltz? Have you made any bonnets?
See you next time,
Sapphira
xxxx

Thank you very useful tutorial, in time for this spring^^
That tutorial is lovely! I'll try to get my hands on a straw hat like that^^I already made two bonnets of fabric (the black one can be seen here: http://fotos.dunkelsuess.de/serve.php/0/photo/ayraleona.11813.1287514050.jpeg ) but a straw one would be perfect for the country Lolita meet-up in may^^
OMG! This is amazing! Thank you for sharing the tutorial and I will definitely try to make one!
As brilliant as always! Thank you very much for the tutorial.
Wonderful! It looks so simple once you break it down into steps! Thank you for this tut! 🙂
This is a lovely way to make a bonnet by hisself. I especially like the brown roses and ribbon. You look very pretty and the bonnet suits you perfectly. I used to love wearing bonnets, too! ❤
You're most welcome! I'm glad you'll find it useful 🙂
I love your handmade bonnet, in fact I love your whole coordinate <3If you make a straw bonnet it's sure to be wonderful 🙂
I want to see, if you make one! I'm sure it's sooo cute on you ^o^
You're very welcome!
My pleasure!
Thank you, I really like antique colours like this. Oh, did you wear lolita before? I can imagine you looked very cute!
Amazing! i will make my own too!! thanks! :3
Good luck! I'm sure it will turn out great 😀
Beautiful!www.nymphearose.com
Pingback: Elegant Poupée 2! | Elegant Poupée